
How to Create a Virtual Tour with an Insta360 Camera
To create a virtual tour with an Insta360 camera, capture a full 360° photo at each viewpoint, export stitched equirectangular JPEGs, upload them to 360are, and connect the scenes with navigation hotspots. Preview the route, then publish and share the tour.
The camera captures the images; Insta360 software prepares the panoramas; 360are provides the tour editor and hosting. You can use this workflow with Insta360 X6, X5, X4, or X3. Compatibility depends on the exported image, so test one panorama before photographing a whole property.
Capture → Export 360° JPEGs → Upload → Connect scenes → Preview → Publish and share
What You Need
- An Insta360 camera, charged battery, and memory card.
- A stable tripod or monopod with a suitable base.
- The Insta360 app or a computer with Insta360 Studio that supports your model.
- A 360are account and your exported panoramic images.
- An existing floor-plan image if you want to add floor-plan navigation.
You can build and preview draft tours on FREE. Publishing a complete multi-scene tour requires PLUS or BUSINESS. Interactive floor plans require BUSINESS; AI Chat is included with BUSINESS or available as a PLUS add-on, with usage allowances. See current 360are plans.
Insta360 X6, X5, X4, and X3: Which Settings Matter?
Choose 360 photo mode, using both lenses. Single-lens photos, reframed images, and Tiny Planet exports do not provide the full spherical view needed for this workflow.
| Camera | Maximum listed 360 photo size | Practical workflow note |
|---|---|---|
| Insta360 X6 | 120MP: 15,520 × 7,760 | Check fine detail and processing time before using the largest export for every scene. |
| Insta360 X5 | 72MP: 11,904 × 5,952 | Export the complete stitched panorama from your source photo. |
| Insta360 X4 | 72MP: 11,904 × 5,952 | Use still-photo settings; 8K video settings describe a different capture mode. |
| Insta360 X3 | 72MP: 11,968 × 5,984 | Keep original files; Insta360 specifies desktop Studio processing for PureShot photos. |
These are maximum still-photo dimensions from Insta360’s X-series specifications. Available resolutions vary with capture mode. HDR settings and menus also differ between models and firmware versions; do not assume that the largest photo size and every processing option can be used together.
You do not need to upgrade simply to connect rooms in a tour. Judge an existing camera by a test panorama: inspect window detail, indoor noise, stitching, and text readability. For equipment comparisons, see the 360 camera guide.
Step 1: Plan the Viewpoints
Walk the space before setting up. Choose positions that explain the layout: an entry, the main rooms, connecting hallways, and relevant outdoor areas. One viewpoint may cover a small room; a large room or a turn in a corridor may need another.
For example, capture Entry → Living Room → Kitchen, plus a hallway position connecting the bedrooms. Make sure visitors will be able to understand each transition. Avoid jumps through walls or between distant rooms with no connecting viewpoint.
Keep a simple list of room names so you can match files to scenes later.
Step 2: Capture Sharp 360° Photos
- Clean both lenses and prepare the room. Check mirrors, open doors, and objects that could block the view.
- Place the camera upright on a stable support at a consistent height. Leave space around both lenses; nearby furniture and doorframes can expose stitching errors.
- Select a 360 still-photo mode. Start with an automatic exposure test, then inspect bright windows and darker corners.
- For a stationary interior, try the HDR photo option supported by your camera. Keep the camera still and avoid people moving through the scene during capture.
- Use a timer or remote trigger and step out of view. Check reflections as well as the direct view.
- Review the result before moving on. Retake blurred, tilted, or poorly exposed images while you are still on site.
If you adjust exposure or white balance manually, aim for a consistent appearance between connected rooms. A brighter image is not necessarily better if it loses all window detail. Keep the original camera files as your editing backup.
Step 3: Export Equirectangular 360 Images
A full spherical equirectangular image is twice as wide as it is high. It looks stretched when opened as an ordinary flat photo; a 360 viewer wraps it around the visitor. Learn more in Equirectangular Images Explained.
Export with Insta360 Studio
- Copy the original photo files from the camera or memory card to your computer.
- Import them into a version of Insta360 Studio that supports your camera.
- Review stitching, horizon, and any available processing settings. Use the stitching settings appropriate to your capture setup.
- Export the complete 360 photo as a JPEG. Avoid exporting only the current reframed view or a Tiny Planet snapshot.
- Open the exported file and check its dimensions and full-scene coverage before processing the remaining photos.
Insta360’s Studio export guide explains the distinction between a full 360 photo export and a non-360 snapshot. Control names can differ in newer versions. For a phone workflow, use the Insta360 app’s full 360 photo export where supported and inspect the saved file in the same way.
Do not upload camera-native INSP, DNG, or INSV files directly to the 360are image uploader. Process the source first; changing its filename extension does not perform stitching or conversion. If you edit a RAW/DNG image separately, finish with a stitched, complete 2:1 JPEG or PNG.
Check the Export Before Uploading
360are’s supported image requirements specify:
| Requirement | Upload target |
|---|---|
| File type | JPEG or PNG |
| Projection | Full spherical equirectangular image |
| Aspect ratio | 2:1 |
| Minimum dimensions | 4,096 × 2,048 pixels |
| Recommended dimensions | 8,192 × 4,096 pixels or higher |
| Maximum dimensions | 16,384 × 8,192 pixels |
The maximum still-photo dimensions listed above fit within that dimension range. Check the actual export: a mobile share operation may have reduced its size. Preserve the 2:1 ratio when resizing, follow any file-size limit shown by the uploader, and avoid enlarging a small image just to claim more detail.
A cropped image does not become a spherical panorama simply because you resize it to 2:1. Confirm that the file contains the whole scene, including the ceiling and floor.
Step 4: Upload Your Panoramas to 360are
- Sign in to 360are.
- Open Asset Upload.
- Select or drag in the exported images and wait for processing to finish.
- Open All Assets and check each panorama in the viewer.
Start with one image if this is your first Insta360 export. Look all the way around, up, and down. If it displays correctly, upload the remaining images. Use the upload guide for additional help.
Step 5: Create the Tour and Connect Scenes
Open VR Tour Editor, choose + Add Assets, and select the uploaded panoramas. Give scenes clear names such as Entry, Living Room, and Kitchen. Arrange them so the first asset is the intended entry panorama.
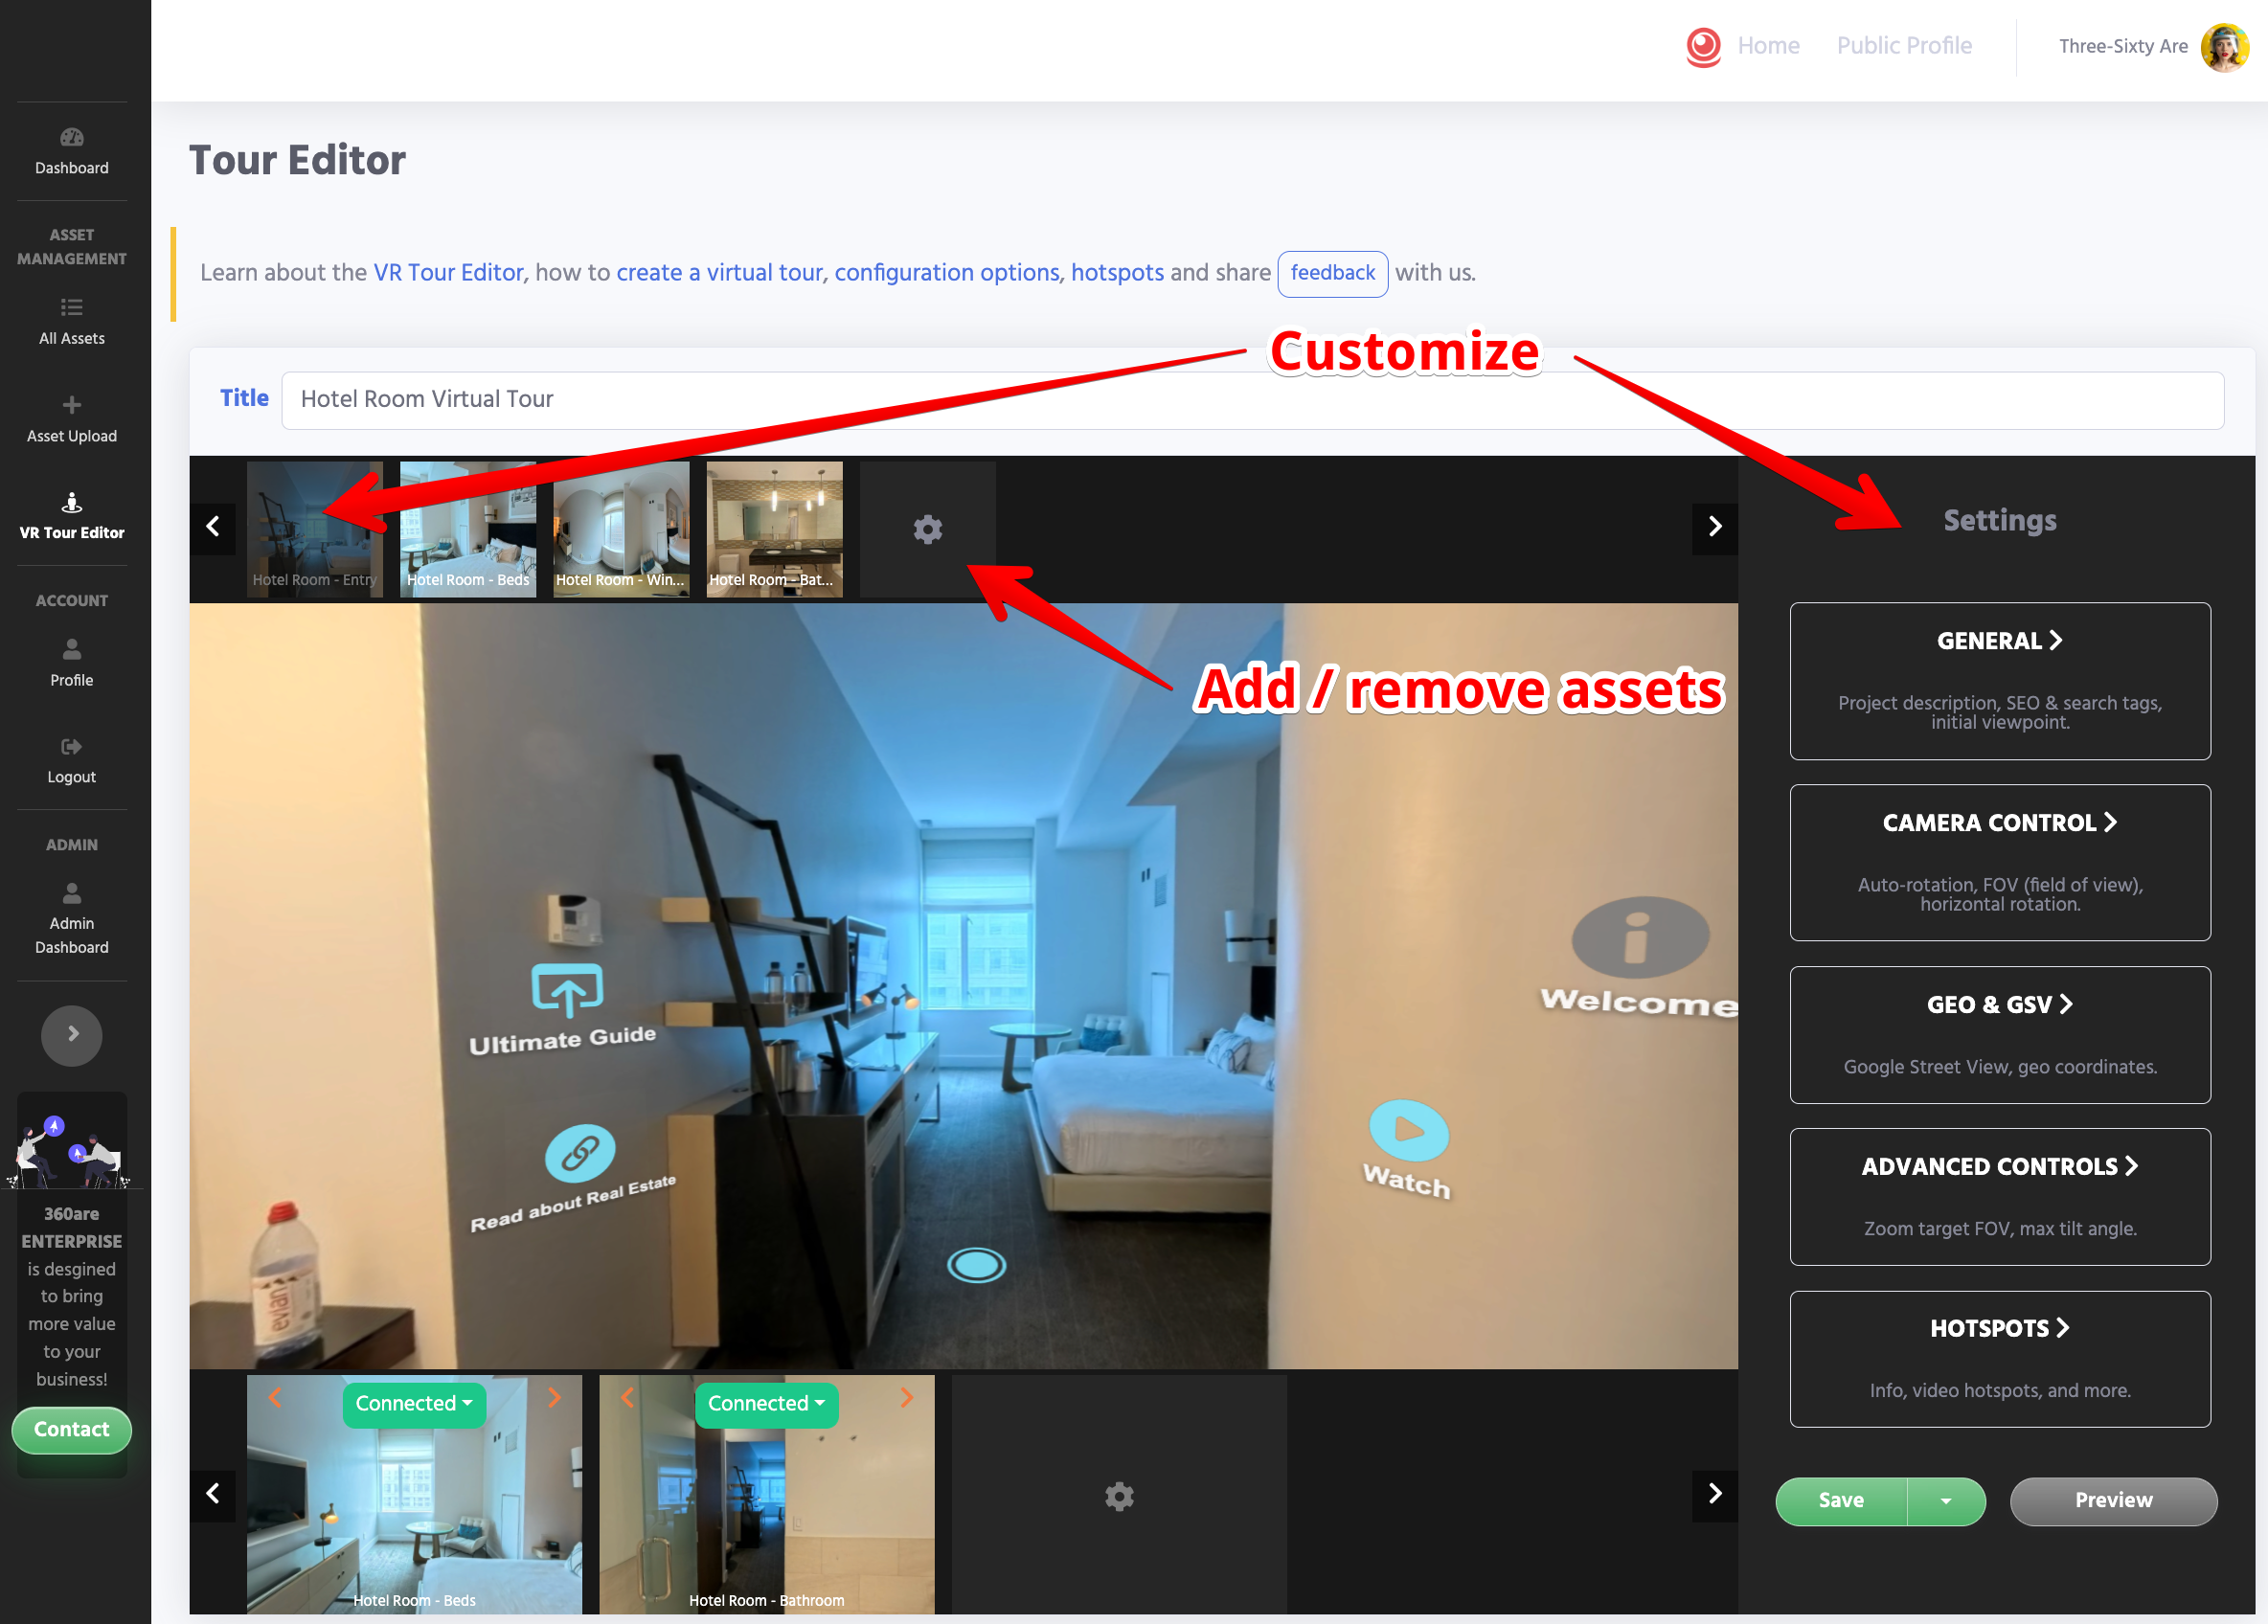
To connect two scenes:
- Open the starting panorama and select + Add Transition Scene & Hotspot.
- Choose the destination panorama and align the scenes to face the same direction.
- Select Disconnected → Add Hotspot, choose an icon and optional label, then select Place Hotspot.
- Place the hotspot at a meaningful location, such as the doorway toward the destination room.
- Preview the transition and check that visitors can return. Add or correct the reverse connection where needed.
Repeat for the natural route through the property. Scene order alone does not create the walking route: the connections determine where visitors can go. Set a useful initial viewpoint and thumbnail, then save and preview. The full tour editor tutorial includes screenshots of these controls.
Step 6: Add Useful Information Hotspots
Navigation hotspots move visitors to another scene. Information hotspots explain something in the current scene, such as a hotel amenity, an exhibit, or a property feature.
Keep labels short and use information that helps the visitor. A text popup can describe an appliance or room feature; a supported YouTube popup can show a relevant video. Avoid covering the panorama with repeated sales messages.
See hotspot types and setup for the supported popup and navigation options. Test each hotspot on a phone, including any linked or embedded content.
Step 7: Add an Interactive Floor Plan
On BUSINESS, open Settings → Advanced Controls → Interactive Floor Map, then Open Floor Map Editor.
Upload a floor-plan image you already have, place each scene marker at the corresponding capture position, and adjust its direction. Apply the changes, save, and test that every marker opens the correct room.
This adds navigation to your supplied drawing. It does not automatically measure the property, generate a floor plan from the Insta360 photos, or create a 3D dollhouse. Follow the interactive floor-plan guide for image requirements and marker controls.
Step 8: Prepare AI Guidance with AI Chat
AI Chat can help visitors ask questions while exploring. Prepare accurate project descriptions, room names, and relevant location information before enabling it. Do not rely on the panorama alone to communicate facts such as booking conditions or accessibility details.
Open the tour’s configuration and find General → Enable AI Chat. Use Validate AI Readiness if available, enable the feature, save, and preview. Ask realistic questions and compare the answers with the information you supplied. If an answer offers scene navigation, verify the destination.
Keep normal navigation available and correct unclear or outdated information. See AI Chat setup and usage, including current plan allowances and additional usage charges.
Step 9: Publish and Share the Tour
Before publishing, walk the entire tour on desktop and mobile. Check the entry view, every room connection, return paths, hotspot content, and any floor-plan or AI features.
Publish the complete tour with PLUS or BUSINESS. A saved draft remains an editing preview; copying its URL does not publish it.
Open the published tour in its own browser tab and use Share to copy the Tour Link or Embed Code. Use the link for email and social posts; paste the embed code into a website block that accepts iframes. Test the delivered link while signed out.
For BUSINESS MLS delivery, use the dedicated Copy MLS Link option and check the receiving MLS’s requirements. Read sharing and embedding instructions and branded and unbranded tour delivery.
Can You Publish the Same Insta360 Photos to Google Street View?
Yes, eligible panoramas can be published through 360are’s Google Street View integration on PLUS or BUSINESS. Connect your Google account, verify the panorama’s location and orientation, publish it, and check its status and the resulting Google view.
The current documented workflow publishes individual panoramas. A connected multi-scene tour hosted on 360are is a separate experience. Do not promise that its room connections, hotspots, floor plan, or AI Chat will transfer to Google. Connected multi-panorama Street View publishing is not established by the current individual-panorama workflow.
Use images you have permission to publish publicly and confirm the location and imagery are eligible. Follow Google Street View publishing with 360are for the current controls, limits, and status handling before offering this as a client deliverable.
Troubleshooting Common Insta360 Tour Problems
| Problem | What to check |
|---|---|
| The image looks like a flat photo or Tiny Planet | Re-export the full 360 photo instead of a reframed view or snapshot. |
| The uploader rejects the file | Check JPEG/PNG format, dimensions, 2:1 ratio, and the uploader’s size limit. Process INSP or DNG files first. |
| Doorframes or furniture appear split | Inspect the source stitching; review capture settings or retake from farther away. |
| Moving between rooms feels disorienting | Align connected scenes and place hotspots toward the actual destination. |
| A room cannot be reached | Check its incoming connection and floor-plan marker, then preview from the entry scene. |
| Visitors cannot open the complete tour | Check publishing status and plan, then test the copied link while signed out. |
For unresolved issues, see upload and tour troubleshooting.
Frequently Asked Questions
Can I create a virtual tour with an Insta360 X3 or X4?
Yes. Export complete stitched equirectangular JPEGs from your X3 or X4, check 360are’s image requirements, and use the upload-and-connect workflow above. The hosting workflow does not require the newest camera.
Does the same workflow work with Insta360 X5 and X6?
Yes. The exported panorama is what matters to 360are. Use Insta360 software that supports your model and check the final file’s projection, dimensions, and format. Capture and processing options differ between models.
Do I need 360 video to create a virtual tour?
No. This guide creates a tour from still panoramic photos, one for each viewpoint. Visitors move between those images using scene connections; recording a continuous video is not required.
Can I upload INSP files directly to 360are?
No. Export a supported JPEG or PNG first. Keep the original INSP and other source files in your backup so you can reprocess them later.
Can I create an Insta360 virtual tour for free?
You can build and preview a draft tour on FREE. Publishing a complete multi-scene tour requires PLUS or BUSINESS. Free individual-panorama sharing is different from publishing a complete tour.
Does 360are automatically create a floor plan from my images?
No. Interactive floor-plan navigation uses an image you supply and scene markers you position. It is available on BUSINESS and does not create a measured floor plan or 3D model.
Will my connected tour appear on Google Street View?
Do not assume that it will. The documented Street View integration publishes individual panoramas. Share your hosted 360are tour to deliver its connected rooms and interactive features.
Create Your First Tour Free
Choosing a host for your exported panoramas? Review the virtual tour software comparison.
Start with three connected spaces, export one good panorama per viewpoint, and build a draft. Test navigation and image quality before expanding the tour.
Create your first tour free in 360are to build and preview it. When you are ready to publish the complete tour, choose PLUS or BUSINESS from the current plans.